


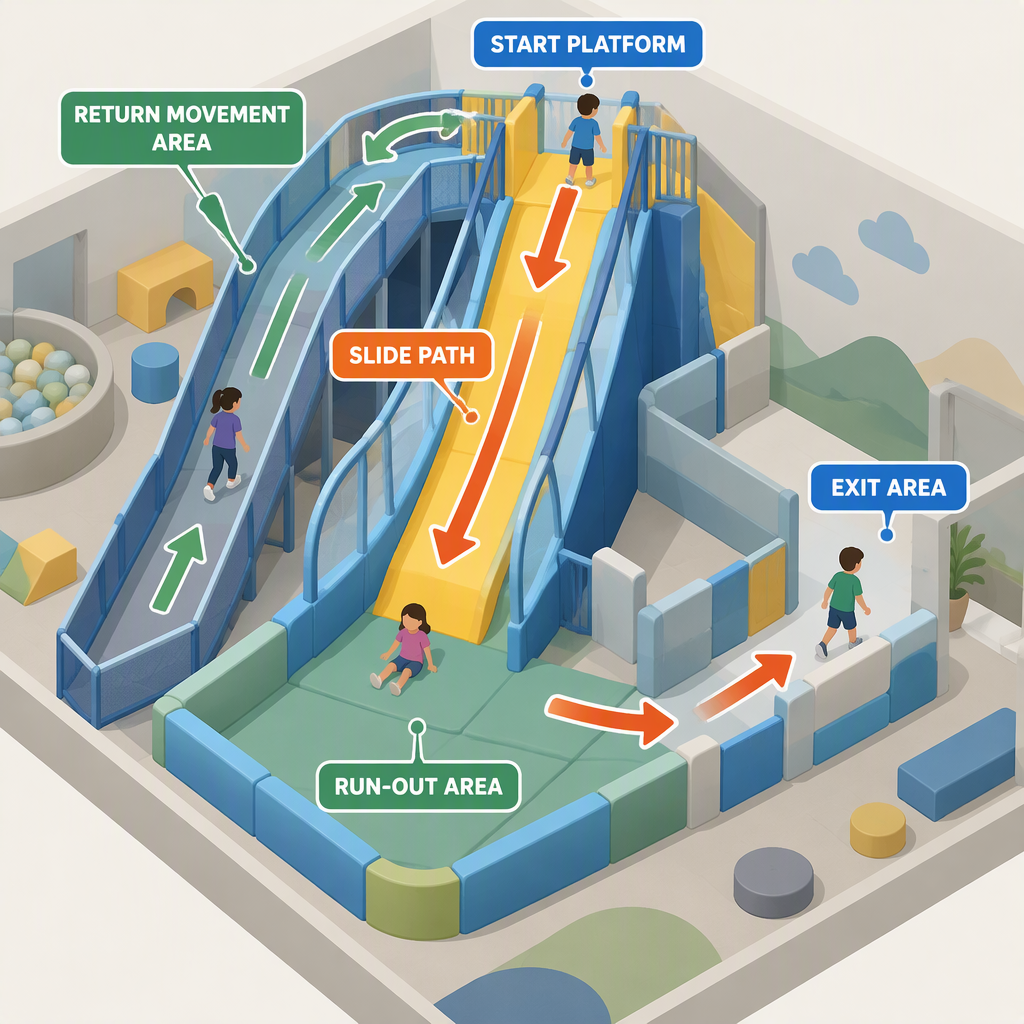
The supplied product information for the Large Stainless Steel Slide Indoor Playground identifies a slide-led indoor playground concept with curved and direct slide movement areas, access or starting positions, run-out, exit and return-route coordination to resolve in project drawings.
That product context is useful for planning because a large slide is not only a visible attraction. It also affects how people approach, wait, commit to the slide, leave the landing direction and reconnect with the surrounding venue. If those paths are drawn too late, the project team may discover conflicts between the queue, slide mouth, exit path, support positions or adjacent activities after other layout decisions are already fixed.
Plan the start before you place the slide
The start area should separate access, waiting and the final entry onto the slide so that riders preparing to slide do not block the return path or nearby activities.
For a large stainless steel slide playground, the start is more than the visible top of the slide. It includes the route riders use to reach the starting position, the waiting zone immediately before the ride decision, the point where staff or signage may control access, and the physical relationship between the start and the rest of the play structure.
- Map the approach route first. Mark how riders reach the slide start from the surrounding play area, trampoline park zone, soft play structure or mixed-activity circulation path. The approach should be legible to a first-time visitor and should not depend on riders guessing where the queue begins.
- Separate waiting from committing. Treat waiting space and the final slide entry as different functions. The waiting area holds people who are not yet sliding; the final entry point is where the next rider moves onto the slide route.
- Keep the return path out of the start queue. When returning riders must pass through the same area as waiting riders, the attraction can become confusing even if the slide itself is visually clear.
- Coordinate start access with support and connection details. The supplied product scope references slide sections, joints, supports, connections, anchoring details and installation responsibilities, so the layout conversation should include more than the visible riding surface.
- Ask for the start condition in plan and elevation. A plan view helps show circulation; an elevation or section view helps the project team understand how the starting position relates to platform height, adjacent structure and access route without turning a concept image into an engineering instruction.
No fixed queue length, rider interval, capacity number, age range or platform dimension should be assumed from the general product concept. Those details need project-specific drawings, local requirements and supplier confirmation for the selected configuration.
The key planning test is simple: if one rider is waiting, one rider is entering, one rider has just exited and one rider is returning, their paths should still be understandable on the drawing. If the plan only works when the attraction is empty, the start relationship needs more work.
Plan the exit from the rider’s landing direction
The exit area should be planned from the slide end outward: riders need a clear run-out, a visible exit direction and enough separation from people waiting to start.
The exit side is often where flow problems become most visible. A rider who has just completed the slide must clear the end of the route before the next rider arrives. The plan should therefore begin at the slide mouth and work outward toward the floor circulation, not begin with leftover room around the attraction.
- Identify the slide-end direction. Mark the direction in which riders leave the slide route. A curved route and a direct route may put attention, sightlines and exit movement in different parts of the room.
- Reserve the run-out as a movement zone. The run-out should not be treated as display space, loose seating, decorative theming or storage. It is part of the rider journey.
- Make the first exit choice obvious. Riders should be able to see whether they move left, right, forward or back into the surrounding venue after leaving the slide path.
- Avoid crossing the next-rider queue. If exiting riders must pass directly through the queue, the operator may face constant interruptions even when the equipment layout appears compact.
- Check adjacent activities from the exit side. Nearby play panels, trampoline areas, soft-play entries, viewing zones or circulation aisles can all affect whether the slide exit feels natural.
The article cannot provide a universal run-out dimension or clearance rule because no approved room plan, final slide geometry, local authority requirement or configuration-specific installation document was supplied. Treat the exit relationship as a drawing-review item that must be confirmed for the actual project.
A practical review method is to trace the rider’s body direction at the slide end, then trace where the rider’s eyes and feet are likely to go next. If the natural exit direction points back toward the waiting line, the attraction may need a different orientation, a clearer return path or a change in surrounding activity placement.
Plan the return route as a separate path
The return route should bring riders back to the attraction or surrounding venue without crossing the slide mouth, the run-out or the next-rider queue.
In many indoor playground layouts, the return route receives less attention than the attraction itself. That is risky because the rider journey does not end at the slide exit. Riders may want to repeat the slide, rejoin friends, move to another activity or return to a parent-facing area. Each of those choices creates movement around the slide.
- Draw the repeat loop. Mark the path used by a rider who exits and immediately wants to ride again. This loop should reconnect with the start without forcing the rider through the run-out or against the next rider’s movement.
- Draw the leave-the-attraction path. Not every rider will repeat. The plan should also show how a rider leaves the slide zone and reaches the broader venue circulation.
- Protect staff sightlines. Where the project intends staff supervision, the return route should not create hidden conflict points at the exit or queue merge.
- Keep component boundaries visible in the brief. If adjacent play activities are part of the same themed area, the project team should still identify which elements belong to the slide route, which belong to nearby activities and which are site circulation.
- Review the loop during value engineering. If the layout is later compressed, the return path is often the first area to disappear. Keeping it as a named route makes it harder to remove accidentally.
The return route does not need to be dramatic. It needs to be understandable. A simple loop that avoids crossing the start and exit can be more operationally useful than a visually impressive path that repeatedly sends riders into conflict points.
Compare route layouts before you approve the drawing
A curved route, a direct route and a multi-route slide change different parts of the room: the curved route changes the plan projection, the direct route changes the forward run-out, and multiple routes put pressure on shared access and separate departures.
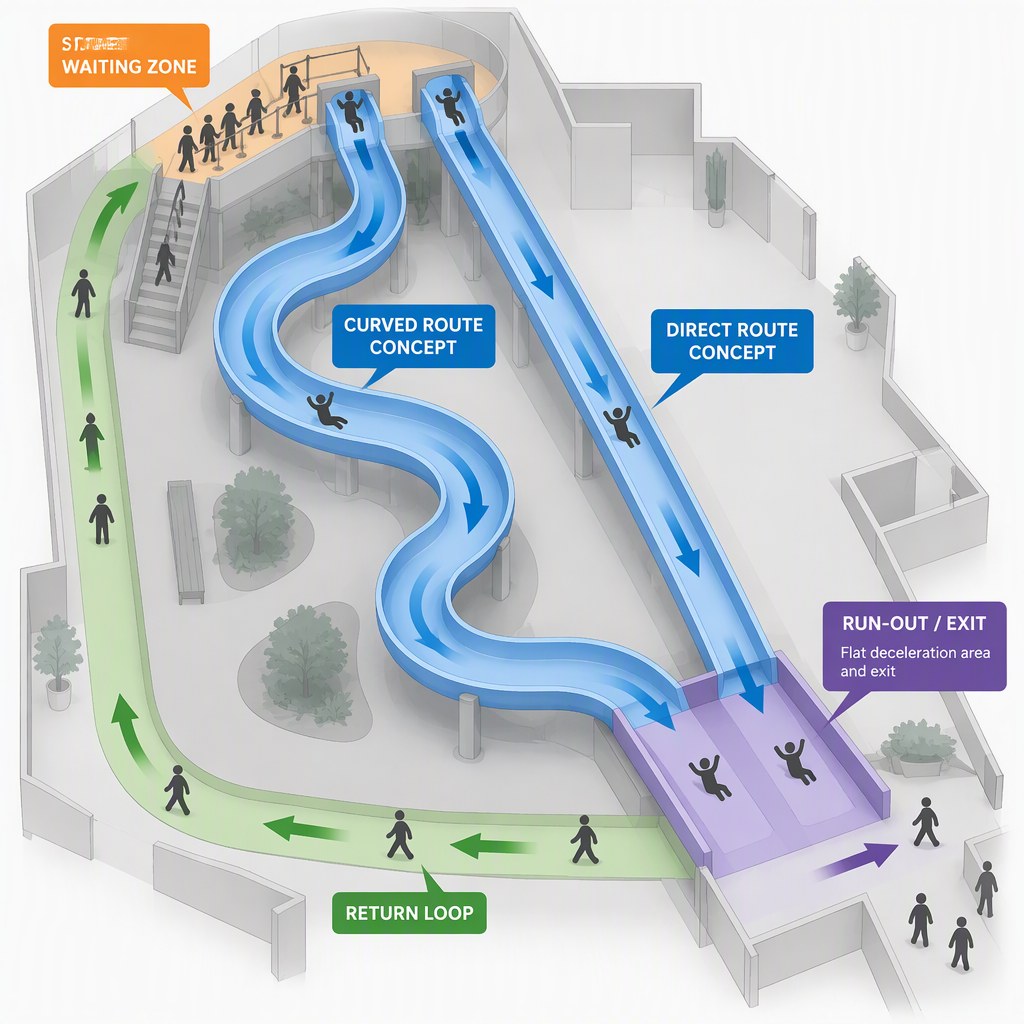
The supplied product context describes a slide-led indoor playground concept with curved metal slide movement and a blue direct slide feature. Those route types should be reviewed as circulation relationships, not only as visual choices.
| Route condition | What to review on the drawing | Typical flow question | Procurement note |
|---|---|---|---|
| Curved slide route | How the route projects across the plan and where the rider exits in relation to nearby activity zones. | Does the curve send riders toward a clean exit path or toward people waiting and watching? | Ask the supplier to show the route, supports, connection points and run-out relationship for the selected configuration. |
| Direct slide route | How the forward landing direction affects run-out, visibility and immediate departure from the slide end. | Can exiting riders move away without reversing into the slide mouth or crossing the next queue? | Confirm the direct route in the same drawing set as the start and exit path, not as an isolated feature image. |
| More than one slide route | Whether routes share access, split waiting lines, converge at exits or require separate return loops. | Do different rider paths merge in a way that staff and visitors can understand? | List each route, its starting position, its exit direction and its relationship with adjacent activities in the project brief. |
This comparison is qualitative because no verified final dimensions, release intervals or capacity data were supplied. The correct output at this stage is not a universal spacing number. It is a drawing that shows how the selected route type affects the start, exit and return loop.
Check standards, approvals and scope boundaries early
For standards and approvals, the safe planning position is to identify the applicable standard edition, local requirements and inspection responsibilities before treating a layout as final.
Because no verified third-party certificate, inspection report, standard-edition confirmation or jurisdiction-specific approval was supplied for the selected configuration, the project team should not treat any general slide-flow article as proof of compliance. Ask which standards, local rules, inspection process and handover documents apply to the actual venue and selected equipment package.
Do not assume that a product image, concept drawing or category page proves certification, local approval, rider capacity, age suitability or final operating rules. Those are separate documentation questions for the supplier, project designer, inspector and local authority where applicable.
The practical timing matters. Standards and approval questions should be raised before the layout becomes difficult to change. If the project team waits until after surrounding attractions, platforms, circulation aisles and finishes are fixed, a required change to the start or exit relationship may affect more than the slide itself.
Turn the flow plan into operating and cleaning checkpoints
Operational planning should define who supervises the start, who watches the exit, how staff keep the return path clear, and how high-touch areas are cleaned without inventing product-specific cleaning methods.
A drawing can show the intended rider loop, but day-to-day operation decides whether that loop remains clear. Before opening, the venue team should convert the start, exit and return relationship into observable checkpoints for staff training, inspection and routine cleaning.
- Confirm where staff or operating signage will control access to the start.
- Confirm how the queue is kept separate from riders who have just exited.
- Confirm where a rider goes after leaving the run-out area.
- Confirm whether repeat riders use the same path as first-time riders or a separate return loop.
- Confirm how blocked exits, crowding near the slide mouth or confusing merges are reported and corrected.
- Confirm which slide-adjacent touch points, access points and surrounding surfaces are included in the venue’s cleaning schedule.
- Request configuration-specific care instructions before selecting cleaning agents or maintenance methods for the installed equipment.
- Keep operating instructions, inspection notes and cleaning responsibilities aligned with the final supplier documents, not with a generic concept image.
For the selected product configuration, cleaning and maintenance procedures should come from manufacturer-approved documents and the venue’s applicable operating requirements. Without those documents, it is safer to define the questions that must be answered than to invent a cleaning method for stainless steel, slide joints, supports or adjacent play materials.
This operating checklist also supports procurement. The supplied product scope references component-level planning items such as slide sections, joints, supports, connections, anchoring details and installation responsibilities. Those items can affect not only installation coordination, but also how the venue later checks access, boundaries and service responsibilities.
Use a project brief checklist before manufacture
A useful supplier brief should ask for a plan and elevation showing start, exit, return route, support positions, component boundaries, site-preparation responsibilities and the standard edition or approval basis to be used.
Procurement teams often focus on the product name, appearance and major attraction type. For a large slide-led indoor playground area, the better brief also asks how the attraction works in the room. The final decision should not rely only on a perspective rendering.
- Identify the selected product name and model in the purchasing and drawing documents.
- Show the rider approach route to the starting position.
- Show the waiting area separately from the final slide entry point.
- Show the slide route or routes, including curved and direct routes where included in the selected design.
- Show the run-out and first exit direction from the slide end.
- Show the return route for riders who want to repeat the attraction.
- Mark adjacent activities that could affect queueing, exit movement or return circulation.
- List slide sections, joints, supports, connections and anchoring responsibilities that need coordination.
- Separate supplier scope, site-preparation scope, installation responsibility and venue operating responsibility.
- Record the applicable approval, inspection and documentation pathway for the project location before the drawing is treated as final.
A project team can use the large stainless steel slide playground product page as a starting point for product identification, then request configuration-specific drawings and documents for the actual venue.
Conclusion
The best slide-flow plan is the one that stays clear on paper before equipment is manufactured: a readable start, a protected exit, a return route that avoids conflict points, and documented responsibilities for the selected configuration.
For investors, operators and project managers, the planning value is not in drawing a decorative arrow around a slide. It is in making the complete rider journey visible early enough that the layout, adjacent attractions, component scope and operating responsibilities can be coordinated together.
- Start planning with the complete loop: approach, waiting, slide entry, slide route, run-out, exit and return.
- Review curved, direct and multi-route slide layouts by how they change movement through the room.
- Ask for drawings that show supports, connections, component boundaries and site responsibilities, not only the visible slide surface.
- Keep compliance, inspection, cleaning and operating procedures tied to final project documents rather than assumptions.
FAQs
These answers focus on practical buyer questions within the available product evidence and avoid unsupported capacity, release interval, dimension, price, certification or case-result claims.
What does rider flow around a large indoor slide include?
It includes the route to the start, the waiting area, the final entry point, the slide route, the run-out, the exit direction and the return path back into the venue or toward another activity.
Should the start and waiting area be drawn separately?
Yes. The waiting area and the final entry point serve different functions. Drawing them separately helps the project team see whether riders waiting to slide will block returning riders, exiting riders or adjacent activity traffic.
Why is the run-out planned before nearby activities?
The run-out is part of the rider journey, so it should not be treated as leftover space after other activities are placed. Planning from the slide end outward helps protect the exit direction and reduces avoidable circulation conflicts.
How should a return route be shown on the layout?
Show the path a rider takes after leaving the slide, including the route for repeating the attraction and the route for leaving the slide zone. The return path should avoid crossing the run-out, slide mouth and next-rider queue.
Does a curved slide route need different planning from a direct route?
Yes. A curved route affects the plan projection and exit relationship, while a direct route puts more attention on the forward landing direction and departure path. The selected route should be reviewed in the room layout, not only as a product image.
Can one article specify the correct rider interval or hourly capacity?
No. Rider interval and capacity require verified configuration details, operating rules, staffing assumptions, inspection requirements and site layout information. They should not be invented from a general product description.
What should procurement ask the supplier for before approval?
Ask for drawings and documents that identify the selected model, start route, waiting area, slide route, run-out, exit, return route, supports, connections, anchoring responsibilities, component boundaries and installation scope.
Can cleaning methods be chosen from the slide concept image?
No. Cleaning and care methods should be based on manufacturer-approved instructions for the selected configuration and the venue’s applicable operating requirements, not on a concept image or generic material assumption.
